Equipment – Manage Schedules
 Overview
Planned Maintenance Schedules are the templates that automatically generate tasks for a piece of equipment based on a recurring pattern. This guide covers adding, editing, and managing schedules from the equipment's Schedules tab. For guidance on choosing the right pattern and setting up schedules well, see Scheduling Best Practices.
 Required Permissions
Scheduling — Read Write
 Getting There
Open the desired piece of Equipment.
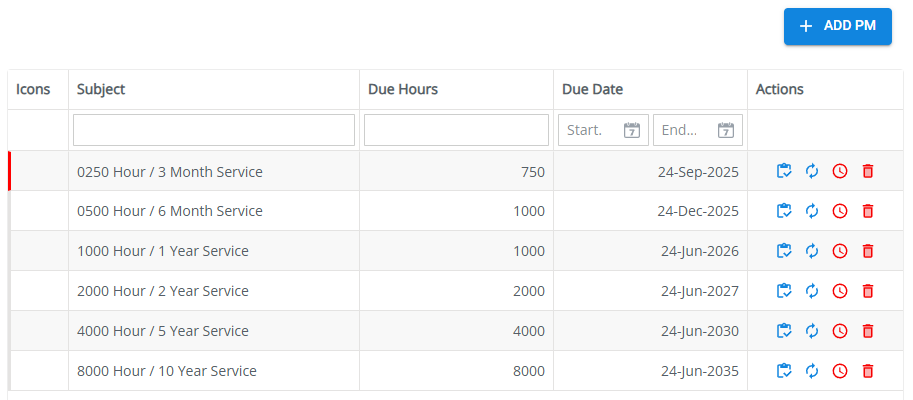
Select the Schedules tab.
 Add a Schedule
From the Schedules tab, click Add.
The form pre-populates based on the selected equipment. Complete the remaining details and configure a Schedule Pattern. See the Schedule Patterns guide for detailed instructions on configuring the Schedule Pattern.
Click Save.
 Edit a Schedule
From the Schedules tab, click the desired schedule in the grid to open it.
Update the fields as needed.
Click Save.
 Trigger a Schedule
Use this when the work still needs to be done, but you want to push it onto the task list ahead of its normal due date — for example, ahead of a long passage or a guest trip.
From the Schedules tab, locate the schedule in the grid.
Click the Trigger Task icon in the Actions column.
A task is added to the task list, due now. Complete it from the Tasks module as normal — see Task Completion.
 Log & Reset a Schedule
Use this when the work has already been completed and you want to record it and reset the schedule's next-due point in one step, without a separate trip to the Tasks module.
From the Schedules tab, locate the schedule in the grid.
Click the Log & Reset icon in the Actions column.
Confirm Yes on the "This Schedule has been triggered to the Task list, log and reset now?" prompt.
Complete the Log Entry form that opens — this records the work performed and resets the schedule's next-due point.
 Suspend/Activate a Schedule
From the Schedules tab, locate the schedule in the grid.
Click the clock icon in the Actions column. This suspends an active schedule, or activates a suspended one — the icon's color and tooltip reflect the schedule's current state.
Important: A schedule cannot be suspended while it has a related task on the task list. Complete or delete that task first.
 Delete a Schedule
From the Schedules tab, locate the schedule in the grid.
Click the Delete Schedule icon in the Actions column.
Confirm the warning to proceed.
Important: Deleting a schedule moves the schedule itself to the Recycle Bin (recoverable), but permanently deletes any related task currently on the task list — this cannot be undone.