Using the Grid
The Grid view is a powerful way to manage and interact with your data in a clear, table-style layout. This guide will walk you through the key features and actions available in the Grid, including sorting, filtering, and grouping, helping you work more efficiently and get the most out of your data.
Icons
Most Grids include an Icons column that visually highlights key information about each record. Common icons are shown below, while module-specific icons are detailed in their respective sections of the Help Center.
Icon | Description |
|---|---|
 | Indicates the Record has related attachments. |
 | Indicates the Record has related photos. |
 | Indicates the Record has related comments. |
 | Indicates the Record is flagged as Critical. |
Add/Remove Columns
You can easily customize which columns appear in the Grid to suit your needs:
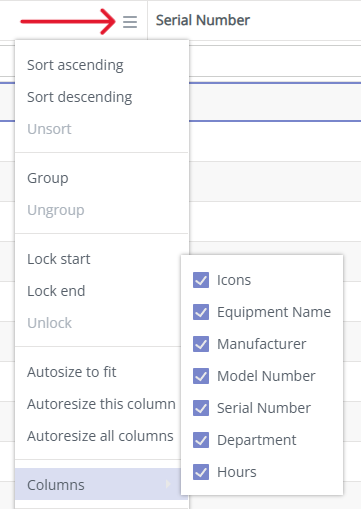
Open the Column Selector
Click the hamburger menu (three horizontal lines) located to the right of any column header.Show or Hide Columns
In the dropdown menu, select Columns. Then simply check the columns you want to display, or uncheck the ones you want to hide.
Once added, columns can be resized or reordered by dragging the header.
Sorting
You can sort the data in the Grid to quickly organize information:
Sort by Clicking Headers — Click directly on any column header to sort the data alpha-numerically. Click once for ascending order and again for descending.
A small arrow icon (▲ or ▼) will appear in the header to indicate that a sort is applied and which direction the data is sorted.

You can change or remove sorting at any time by repeating the steps above. Blank or empty values in the sorted column are treated as sorting after "Z" — so they appear at the bottom when sorted ascending, and at the top when sorted descending.
Grouping
You can group data in the Grid to organize rows based on shared values:
Group by a Column
Click and drag a column header into the blue grouping bar above the Grid.

Create Sub-Groups
Drag and drop additional headers into the grouping bar to create nested groupings (e.g., group by Department, then by Manufacturer).

Remove Groupings
To remove a grouping, drag the header out of the bar or click the "x" button on the header in the bar.
Grid Filtering
You can filter data in the Grid to search for specific entries based on keywords and/or date ranges:
Filter Text Fields
For text-based columns, a search bar appears beneath the header. Simply type a keyword to instantly filter results that match.Filter by Date
For date columns, use the Start Date and End Date fields to define a range.
You can use either field independently or both together to narrow the results, in this example the search results will show Log Entries between the specified dates for the Equipment “Main Engine Stbd“.

Filters can be combined across multiple columns to refine your view. Clear filters using the “x“ button.
Results Per Page
You can control how many rows are shown on each page of the Grid using the rows-per-page selector in the bottom-right corner of the Grid, below the pagination controls.
Click the current value and choose a new number of rows from the dropdown.
Use the pagination arrows alongside it to move between pages of results.
The Grid Layout
YMS remembers your grid settings & layout in two different ways:
Saved to your Session (Persists until you refresh or close your browser)
Sort order
Grid Filtering (the per-column search and date boxes above)
Module Search Filters
YMS remembers filtering and sorting as you move between modules, so you don't need to re-apply them each time. As soon as you refresh the page or sign out, filters are removed and the Sort Order reverts to the default.
Saved to your browser (Persists until you Log Out)
Which columns are shown or hidden, their order (left to right), and their width
Grouping
Your Results Per Page setting
YMS remembers your Grid Layout even after you close and reopen the browser, or refresh the page, so you can configure the Grid Layout to meet your needs, and it stays consistent until you log out.
The Grid Saved Views
If you want to switch between different grid layouts or reinstate a layout after you have been logged out, or on a different device you can save the view. .
Saving a View
Configure the Grid layout as required, columns, sorting, Grouping, and results per page.
Open the View by dropdown, above the Grid.
Select Save View.
Enter a View Name and click Save.
Your new view now appears in the View by dropdown. Select it at any time to instantly switch the Grid back to that saved layout.
Deleting a Saved View
In the View by dropdown, click the trash icon next to the Saved View you want to remove.